Our clients ask us “How do I cancel the Binge subscription in Canada?” Well, there are a few different ways to cancel the Binge subscription, depending on how you originally subscribed. But first, let’s talk about Binge and what it offers.
Binge features a completely commercial-free on-demand video experience from services like HBO Max, Netflix, and Disney+. With your Binge subscription, you can now unblock the complete Australian library on Binge for watching Jumper, The 100, Spectre, Super8, Deserter, and other best shows and Binge movies.
But even with the great content, if you still want to cancel your Binge subscription for whatever reason, you only need to follow a few easy steps to discontinue your Binge membership.
So, is it easy to cancel the Binge subscription? Yes, it is and we will show you how! P.s., if you’re trying to cancel Binge in Candad then get a premium VPN like ExpressVPN!
How to Cancel Binge Subscription in Canada through Different Methods?
You can cancel Binge using any of the 3 methods below!
You are always free to cancel your Binge subscription, even right after signing up. So if you’re asking “How do I cancel the Binge subscription in Canada”, then you’re in the right place. You may cancel your Binge membership by following these simple steps below:
Method 1: How to Cancel Binge Subscription in Canada via Web Browser?
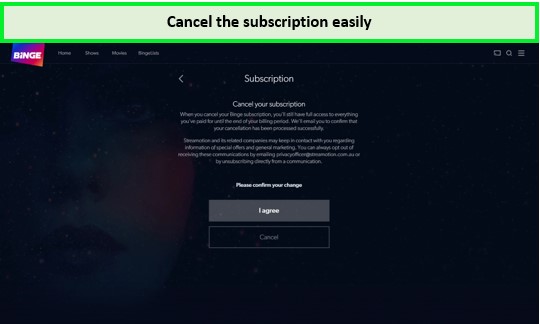
It is fairly easy to cancel your membership – all you need to do is go to “Binge my account” and cancel from there. Follow the steps below to complete the cancellation process:
- Go to https://binge.com.au/
- Sign In to your account and select your profile
- Open the menu and select ‘My Account
- Select ‘Cancel Subscription
- Click ‘I Agree
- Fill out the short survey to let them know why you’re leaving
- A cancellation notification will be sent to your email address
Note: If you’re trying to cancel Binge in Canada, then make sure to connect to ExpressVPN before starting the cancellation process.
Method 2: How to Cancel Binge Subscription in Canada through Binge App?
If you want to finish canceling your subscription via the mobile app, follow the instructions below:
- Launch the Binge app and sign in.
- Launch the menu, then select “My Account.”
- Click the “Manage Account” button.
Note: You will be sent to a web browser.
- Enter either the email address and password you used to register the account or the cell phone number you used.
- Choose your preferred profile.
- Click the “Cancel Subscription” button.
- Confirm the cancellation agreement.
Note: If you’re in Canada; the only way to start the cancellation process is by connecting to ExpressVPN!
Method 3: How to Cancel Binge subscription easily through Apple ID?
Cancel Binge on Apple device via “Manage Subscriptions.”
If you want to know how to cancel the Binge subscription in the app store, then these steps are for you. You can only perform them if you subscribed to Binge through the App Store and please note that your cancellation must be processed at least 24 hours before the renewal.
This is due to the fact that it takes Apple at least one day to update its customer billing data. So without further ado, here are the steps on how to cancel the Binge subscription in the app store:
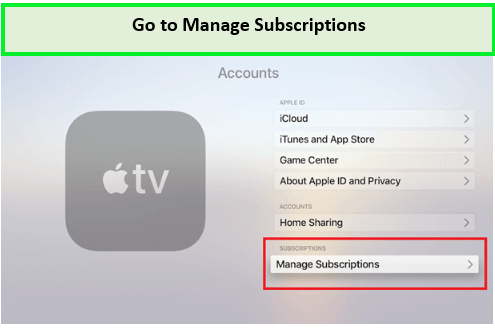
- Launch the App Store, then enter your Apple ID and password to sign in.
- Choose the Account Profile Icon from the Menu.
- Choose the option to Manage Subscriptions.
- Choose the Binge app.
- To terminate your subscription, click the “Cancel Subscription” button.
Additionally, there’s an alternative way to cancel “my Binge subscription” and here’s how:
- Go to the settings menu.
- Choose the page that contains your name and Apple ID.
- Choose Among the Subscriptions
- Use the Binge option.
- Click the “Cancel Subscription” button.
Note: To cancel Binge in Canada, first connect to ExpressVPN.
FAQs – Cancel Binge Subscription in Canada
Can you cancel Binge in Canada before the free trial ends?
How do I cancel my Binge subscription with Telstra?
How do I cancel Binge subscription in Canada on Mac?
Wrapping up
With the plethora of the best movies and shows that Binge offers, it is only seldom that users cancel their subscriptions. If you’re one of those who want to cancel the Binge subscription in Canada, this article features the questions and answers that commonly pop up.
Canceling your Binge membership is as easy as taking a few quick steps and won’t need you to break a sweat in the process. We hope that you found this tutorial to be informative and straightforward to follow.